Please confirm you are 19 or older to enter by entering your date of birth
Grow Your Own

A Guide to Growing Cannabis from Clones

April 17, 2024

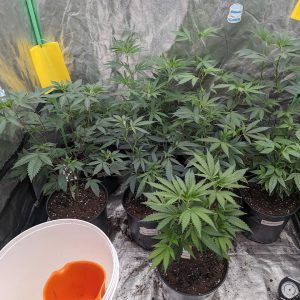
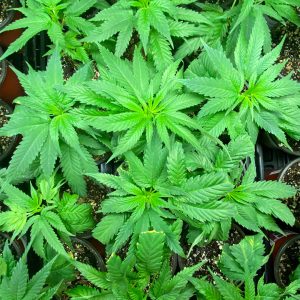
Growing cannabis from clones can be both exciting and rewarding, offering a way to cultivate your favorite strains with consistency and precision. However, it can also be a complex process that requires careful attention to detail. Whether you’re a novice or an experienced grower, proper care of your clones is essential for ensuring optimal growth and maximizing yields.

In this step-by-step guide, we’ll walk you through the process of taking your clones from their initial stages to healthy, mature plants ready for harvest. With tips from Canada’s Top Grower, Genevieve Newton, spread throughout, this article is designed to empower you in cultivating your own thriving garden.

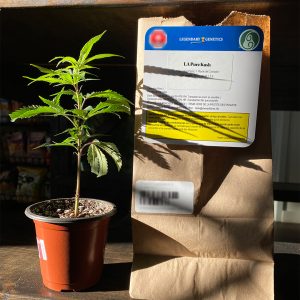
Selecting Clones from Stewart’s Herbal Dispensary

Since legalization, the public has several options to purchase cannabis clones, including from Stewart’s Herbal Dispensary.

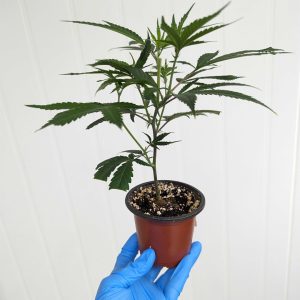
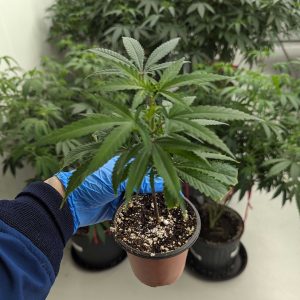
At Stewart’s Herbal Dispensary, we take pride in offering a diverse selection of healthy cannabis clones sourced from our robust genetic library. When choosing clones, consider factors such as growth time, expected potency, and yield to find varieties that suit your preferences and growing environment. You should always do your research before selecting your clones, but lucky for you, our helpful budtenders are trained by Canada’s Top Grower, Genevieve Newton, so you’re in good hands!

Eash season, Stewart Farms offers a unique variety of cannabis strains to the public. So, depending on the time of the year, different options will be available to you.

Preparing Your Growing Space

Before transplanting your clones, it’s crucial to prepare your growing space. Whether you’re growing indoors or outdoors, ensure you have adequate lighting, ventilation, and temperature control. Select containers with proper drainage and choose a high-quality soil mix or hydroponic system tailored to cannabis cultivation.

⚡ #TopGrowerTip: Keep it simple, less is more is my motto. I personally use vivosun brand from Amazon. A great cost efficient option.

Acclimate Your Clones

When you bring your clones home, they may need some time to adjust to their new environment. Keep them in indirect sunlight or low-level light for at least 16-20 hours a day to reduce stress before transplanting them into their permanent containers.

Choose the Right Containers

Select pots or containers with adequate drainage holes to prevent waterlogging. Fabric pots are popular for their excellent drainage and air circulation. Ensure pots have air flow underneath them.

⚡ #TopGrowerTip: We recommend 3 to 4 inch pots to start, up potting with the plant’s momentum (once you see multiple roots poking out of the bottom of the pot it’s a sign the plant is ready to be transplanted) first to 1 gallon and then to 3 gallon and so on, allowing the plant to maximize root development in each new pot.

Prepare Your Growing Medium

Choose a high-quality soil mix or hydroponic system suitable for cannabis cultivation. Ensure the pH of your growing medium falls within the optimal range for cannabis growth (around 6.0 – 7.5 PH for soil) (around 5.5-6.5 PH for hydroponic).

At Stewart Farms, we suggest you prepare a bucket with premixed soil. Spray with water and mix well, ensuring soil is moist and fully saturated (not wet or dripping). You should be able to form a loose ball of soil together.

Fill your pots with soil and create 2×2 inch holes with fingers for the cube.

🤔 #CannabisClarification—PH Scale: PH is the scale used to specify how acidic or basic your water is, 0 being acidic, 7 being neutral and 14 being basic. Each nutrient has a ph range that is ideal for uptake falling within the above stated ranges.

⚡ #TopGrowerTip: A way to check the PH of your medium is to perform a leach test, collecting a small amount of run off after a watering event and using a PH meter to see if it falls within a healthy range.

Transplant Your Clones

Gently remove each clone from its container, being careful not to damage the delicate roots. Place rooted clone into soil of your prepared containers, ensuring the root system is covered with soil and the plant is positioned at the same depth as it was in the clone tray.

Cover and pack firmly until the soil is flush with where the rockwool meets the stem. Pack firmly but gently, do not bury stem.

Provide Adequate Lighting

Cannabis plants require plenty of light to grow and thrive. If growing indoors, invest in high-quality grow lights such as LED, HID, or fluorescent lamps. If planting outdoors, the grow area should have direct sunlight from 10am-4pm, (more is better).

Plants grown indoors should be given 18 hours of light per day during their vegetative stage and then reduced to 12 hours at the start of, (and to trigger) the flowering stage. Please refer to your grow light manufacturer’s recommendations regarding light intensity and distance your light should be from the canopy.

⚡ #TopGrowerTip: The flower stage is triggered by 12 consecutive hours of darkness. This 12 on 12 off schedule will need to be strictly followed for the entire 7-12 weeks (depending on the breeder recommendations). Most indoor growers use timers to keep the consistent routine. These can be purchased cheaply on Amazon.

🤔 #CannabisClarification—Canopy: The term “canopy” refers to the collective mass of foliage and buds formed by the upper branches of the cannabis plants. The canopy essentially represents the top layer of the plant canopy where the majority of the photosynthesis and growth occur.

Maintain Optimal Temperature and Humidity

Keep your growing space within the ideal temperature range of 70-85°F (21-29°C) during the day and only slightly cooler at night. Maintain humidity levels between 55-75% during the vegetative stage, then lower it to around 40-60% during flowering.

Watering Your Plants

Lightly water each pot after transplant (6.3-6.8 pH for soil). Water your plants when the top inch of soil feels dry, being careful not to overwater as this can lead to root rot.

One of the worst things you can do to your cannabis plants is over-water them. To avoid this, place your finger 2.5-5cm, (1-2”) down into the soil and water if it is dry. Ensure your growing medium and container have adequate drainage in order to avoid water-logging and drowning your roots.

Nutrient Management

During the vegetative stage, feed your plants with an all-purpose, (e.g.: 4-4-4) fertilizer. Once they have started the flower stage, switch to a fertilizer that is lower in nitrogen, higher in potassium and phosphorous content, such as a 2-8-4.

Typically, fertilizing is done every 3-4 weeks, but refer to the directions on the package regarding how much fertilizer to add and when. If using chemical-based nutrients, (e.g.: General Hydroponics) do not add any during the last couple weeks before harvesting to allow for a proper flush.

⚡ #TopGrowerTip: If you want to keep it simple, top quality and affordable like me, I recommend Gaia Green Organic Fertilizer, both All Purpose and Power Bloom is all I use for the entire plant life. If you want to grow with salts or synthetic nutrients, I use Remo Nutrients; Velo Kelp, Micro, MagNifiCal, Grow and Bloom for the entire plant life. You will also need a PH up solution or PH down solution depending on the PH of the water you intend to use. You will need both a PH and EC meter, I use Hanna GroLine meters.

Pruning and Training

Throughout the vegetative stage, prune your plants to encourage bushier growth and remove any yellowing or damaged leaves. You can top each plant 3-5 days after first transplant and as many times as needed as the plant grows to get the preferred shape.

After 3 weeks of veg, complete a light bottom prune to make sure nothing is touching the medium and take off any nodes that will be wasted energy and restrict airflow, usually about 20-30% of the lower foliage.

Consider training techniques such as topping or low-stress training (LST) to maximize yields and promote even canopy growth.

⚡ #TopGrowerTip: Pruning can be a hot topic; I defoliate and prune excess foliage to increase airflow and ensure even light distribution for less larfy buds at the end. Be careful not to over prune or over defoliate. Each fan leaf is a source of nutrition for the growing nodes and buds. The more you take the more you will need to replace with food. A good thing to remember is that after the first 3 weeks of flower or the “stretch” part of flower is when the plant starts redirecting its full energy from foliage production to bud production. Most of the fan leaves you remove after this point will not grow back and taking too many, can stunt the plant effecting the overall yield in the end.

🤔 #CannabisClarification—Topping: The technique of removing the apical (topmost) growth of the main stem. This is typically done by cutting off the tip of the main stem above a node where new growth is desired. Topping encourages lateral growth, leading to bushier plants with multiple main colas instead of a single dominant one. This practice can increase yields and promote a more even canopy, ultimately enhancing the overall health and productivity of the cannabis plant.

🤔 #CannabisClarification—Low Stress Training (LST): LST involves gently bending and tying down branches to encourage horizontal growth and create an even canopy. By training the plant in this manner, growers can optimize light penetration, increase airflow, and promote more uniform bud development. LST is typically performed during the vegetative stage and can result in higher yields and improved overall plant health.

Monitor for Pests and Diseases

Regularly inspect your plants for signs of pests such as spider mites, aphids, or whiteflies, as well as common cannabis diseases like powdery mildew or bud rot. Treat any issues promptly to prevent them from spreading.

⚡ #TopGrowerTip: The best way to keep unwanted pests and pathogens at bay is to have an Integrated Pest Management (IPM) practice or process. Early intervention and daily crop scouting are the only ways to ensure a healthy successful crop throughout the plant’s life. Most new growers learn this the hard way and that’s ok, it’s how I learned at home too. Start doing research and identify the pests or pathogens indigenous to your location and then look at biological or natural ways to repel them or irradicate them if you get an infestation. Go to your local garden centres and ask if they sell biological predators like swirski mites who eat thrips or nematodes that hunt gnats or lady bugs, whose larvae will eat 1000 aphids a day and the adults, 500 a day. No need to use toxic sprays or pesticides, these plants are medicine that you will be consuming.

Harvesting and Curing

Harvest your cannabis plants when the flowers are mature and the trichomes have turned cloudy or amber in color. Hang the branches upside down in a cool, dark, and well-ventilated space to dry for about a week.

Trimming

Trimming involves carefully removing excess leaves and stems from the flowers to enhance their appearance, flavour, and potency. Using sharp scissors or trimming shears, trim away any large fan leaves and excess foliage, leaving behind only the densely packed buds. Pay close attention to detail, ensuring a clean and uniform trim to improve the overall aesthetics of your final product. Properly trimmed buds not only look more appealing but also burn more evenly when smoked or vaporized.

Storage

Once trimmed, the buds can be further cured and stored in glass jar or airtight container to keep fresh and enhance their flavor profile. You will need to “burp” or vent the buds daily at first as they are more at risk of getting moldy before the cure is complete.

⚡ #TopGrowerTip: I recommend venting the cannabis daily for a week and then every couple of days after that until it reaches your desired moisture. I like my flower to test around 9-10% moisture. I use Triminator moisture meter at home and at work to test buds daily as they dry and cure.

Enjoying the Fruits of Your Labour

Finally, after all your hard work and dedication, it’s time to enjoy the fruits of your labor. Sit back, relax, and savor the experience of consuming your homegrown cannabis.

Indoor vs Outdoor Growing

Outdoor Growing:

  • Only one harvest per year.
  • You must secure your plants from animals and/or thieves.
  • There needs to be a convenient source of water nearby.
  • The area should be well-lit by the sun and optimally have direct sunlight from at least 10am-4pm (more is better).
  • The climate should have a warm growing season, the longer the better.
  • Plants must be planted at a certain time of the year and often there can only be one crop per year.
  • Usually a longer grow time.
  • Potential interference from bugs, animals, frost, and other uncontrollable factors.

Outdoor Benefits:

  • Easiest method since cannabis plants need less tending in their natural environment; if you live in an area with the right growing environment, you can pretty much let mother nature do her thing.
  • The cheapest start-up costs since there is free light and ventilation.
  • Often have bigger yields than indoor crops, since outdoor plants usually have plenty of room to grow and unlimited sunshine.
  • Many people feel that outdoor growing produces the most flavorful buds (this is likely due to the light from the sun, though there’s some evidence that certain lights like LEDs may be able to mimic the sun in ways that cause buds to grow with increased scent and flavour.

Indoor Growing:

  • Ability to produce perpetual harvests.
  • Must have enough room to grow indoors with a great enough power supply.
  • Start-up costs can be high depending on grow system.
  • You can control all aspects of the growing environment, which means you will be able to produce a more consistent quality of buds.
  • Cost of growing supplies, nutrients, or amendments.
  • You pay for electricity to run lights, which can get expensive.
  • More upkeep than an outdoor grow.
  • Must keep good ventilation and maintain a clean grow area.

Indoor Benefits:

  • Shorter grow time.
  • Easier to be discreet about growing.
  • Ability to control all aspects of the environment to produce a consistent high-quality bud.
  • Can have multiple crops per year (perpetual harvest is possible).
  • Many growers believe that indoor buds are the highest quality buds. In the medical and recreational industry, indoor buds are sold at much higher prices than outdoor buds.

A Final Thought (and one more tip!):

By following the comprehensive steps outlined in this guide and providing your cannabis clones with the proper care and attention, you can successfully nurture them into healthy, mature plants ready for harvest.

Remember, growing cannabis is both an art and a science, and each grower’s journey is unique. Embrace the learning process and don’t be afraid to experiment along the way. Research, observation, and hands-on experience are your greatest allies in mastering the craft of cannabis cultivation. With Stewart’s Herbal Dispensary clones as your starting point, you have access to high-quality genetics to kickstart your growing adventure. So, don’t hesitate to jump right in and begin cultivating your own cannabis garden. Happy growing!

⚡ #TopGrowerTip: I always do a lot of research on the strains I want to grow as well as the different breeders that might offer what I want. Watch out for a bad deal! Never buy anything from Instagram or Facebook, ensure the seedbank or breeder has good reviews and has been at it a long time, my rule is 10+ years. My favourite seedbanks are True North Seeds, Attitude Seedbank and Amsterdam Marijuana Seeds. Some of my favourite breeders are Purple Caper Seeds, Dinafem, Barney’s Farm, In House Genetics, and Pacific NW Seeds. It’s a good idea to pick strains that will work well in your growing environment and location.